Thursday, 20 November 2014

Contapalerey Elizabethan

For this week for our practical lesson we had the chance to practice a contemporary Elizabethan hair do. For this assessment my partner and I discussed what kind of design she would like.

She wonted plats, bun, and volume.


Step by step on how I achieved this look.


·         Detangled the hair well using a denim brush.
·         Applied heat protector
·         Using crimpers I crimped the hair starting from the back making my way to the front.
·         When the whole hair had been crimped, i brush it all out to get an Afro effect.
·         I Divide the hair into two, top and bottom.

·         Secure the bottom hair in place using a clip.
·         Then Divide the top hair in to two.
·         Secure one side in place so as to keep it out of the way
·         Took a small section of hair from the crown of the head all the way to the front and then side to the mid back.  (Like a love shape.)
·         Cornrow the small sectioned hair starting from the crown all the way to the mid back.    
·         Do the same for the other side as well
·         At the back, brush the hair out then divide it into four sections.
·         Cornrowed each section up towards the centre
·         Took each sections left at the front and back comb, then smooth to create the shape and pin it in place.
·         Put hair left out in to a pony and create a bun.    

The final look was better than expected. I think it was a good interpretation of a contemporary Elizabethan.
In the Elizabethan era the hair had mare texture because they used hot ion to curl their hair. The hair had a lot off volume because they used to wear wigs a lot. Plats and buns were a very common style to have in those days because it made the hair look beautiful and kept it out of the way and in place for long.   
In the future when I do this style again I will make the bun a lot bigger. I will also use padding instead of back combing at the front two sections to give more volume and security. Also with a pudding it’s going to be much easy to manipulate the hair and shape. I will use hair spray to keep all the hair in place and stop any flyways.   


Thursday, 13 November 2014

practice of the Elizabethan look


Ref: https://www.google.co.uk/url?sa=i&rct=j&q=&esrc=s&source=images&cd=&cad=rja&uact=8&ved=0CAYQjB0&url=http%3A%2F%2Fwww.emmacadecmakeup.co.uk%2F%23!media&ei=4bF_VMaULo6HPfrIgLgF&psig=AFQjCNFQWVHSXfFp4iWhZLWSTeUcOuzeqw&ust=1417741152332891

the heart shape hair style seems to be very popular in the Elizabethan era. through out my research the one thing that i keep finding about the Elizabethan, particularity on Elizabeths the 1st portrait is the heir shaped hair.

today this type of style can be mostly seen in catwalks and hair shows.  designers such as channel have been know to use this inspiration.
yeowzers.blogspot.com 
www.palacinka.com 


This week lesson we got to practice the Elizabethan look on each other. this was a very exiting session for me.


  • to start off i prepped my modal by putting a gown on her and making sure that her hair is will brushed out. 
  • i them divided her her hair into two the top and bottom. 
  • climped  the bottom part of her hair using climpers and curled the top part of her hair using medium size tongs. 
  • then used two padding to create the shape that i wonted which is a heat shape.  
  • dividing the hair into two i in-stored the padding in both sides and the back combed to create more volume. 
  • i presided to mold the hair to the desired shape and then pined it in place. 
  • the front part of the hair that i had curled, i brushed it our and and started to pin it in place to create a more wavy effect. 
i think the end results could have been better. for once i should not have brushed out the curls, brushing out the curls got red of the texture i wonted to see. also the two pudding used do not look equal. however the style looked lovely due to the fact that my model hair had three different colors.

in the future i will make sure that the pudding is placed in the write place by stepping away from the model and checking to see if the placement is the same. also i will not brush out the curls in the future.

equipment's used

  • comb 
  • hair brush
  • hair pins
  • climperd 
  • tongs 


creating an Elizabethan heart shaped hair do

In a few of Elizabethan portraits, the hair is in a heart shaped up do.


this image is a modern image of the Elizabethan era look  
in this pic the hair has been curled using small tong and then pined in place using small skinny pins.
the use of lace and purls gives it that extra Elizabethan look. also the white makeup and red small lips and red chicks is the some as a upper class Elizabethan women would look.  


in the lesson today we were asked to create heart shaped Elizabethan hair do. for this look i used two equal padding and a lot off hair pins. i also climped the hair to give it the Afro texture.


  1. i climped the hair 
  2. divided the hair into two, in the middle 
  3. sectioned out a small amount from the front of the hair 
  4. using a padding i placed it in the center of one of the divided section, but fast i did a small flat french plat at the center to help support the padding in place. 
  5. using hair pin, i pined the padding in lace on top of the french plat. 
  6. then i back combed the hair to create more volume and molded it in place. 
  7. taking the sectioned hair at the front i brushed it in place to give a more smooth effect.
  8. i repeated the steps again on the other side. 
holding the head up ageist the wall i checked if the shape was even. as seen in the pictures above the shape is perfect but one side of the pudding in slightly off. also the sides should be more sleek and Cline. 
in the future i will use hair spry to get rid of any flyways. also i will try and put the pudding in the exact place as the other pudding to avoid one side been slanted. 


crimping and curling

looking at the Elizabethan hair style, hair looks more textured and frizzy.
The elizabethans were known for having there hair in a textured form. they used to climp there hair using hot ion. this kind of look was mostly seen in elizabethan wigs. 

www.polyvore.com 
the411atnoellesalon.blogspot.com 
Climping and curling is not just stuck in the Elizabethan era, today you will see catwalk looks by the top designers such as Alexander McQueen work to channel and Vivian Westwood,  using clumped hair in their final overall image.


For this week we had the opportunity of leaning how to crimp and curl hair to achieve the Elizabethan look. In the Elizabethan times women would crimp and curl their hair using hot ions. this would have been highly damaging to the hair and because they did mot use heat protector.

To achieve a similar frizz look and a curl look, i used clippers and tongs. i also used pins to hold the curls in place and also to create a more defined frizz texture.


crimping gives the hair more of a soft Afro texture. the deep waves in the hair are more defined and visible. as seen in the pictures.


  • to crimp section the hair into small sections and start crimping from the root to the tip. 
  • continual the process all over the hair. 
  • on the right the hair has been brushed out and on the left the hair has not been brushed out  


equipment used 
  1. clippers
  2. hair brush  
  3. comp


curling the hair give it more of a soft wave look. 

to create this look, 
  • section the hair into smaller sections and using a curling tong curl the hair and secure it with a hair pin so that the curl douse not fall. 
  • continual the process through out the head. and then live to cool.  
  • once the hair has cooled remove the hair pins and brash it out if need be. however you can live the hair without brushing and style it.
  • on the right picture the hair has been brushed out and on the left the hair has not been brushed. 
equipment's used
  1. hair brush 
  2. tongs
  3. comp   
  4. hair clips 
 

above is another way of clipping the hair to make the hair frizzy.

using the wide large pin weave the hair in the pin from the root to the tip. once all the hair is in use a small hair pin to hold it in place, then using a straightener clamp the weaved hair in place in between the straightener and hold it for 10 seconds then relies it. allow the hair to cool before taking it out.
the result is more of a S shape. when separated the waves become more defined.

equipment's used

  1. hair brush 
  2. wide hair pins 
  3. small hair pins 
  4. straighteners         


plats and buns

french plats, fish tell plat and buns

http://lhresources.files.wordpress.com/2012/11/detail-the-way-to-calvary-bassono-cropped.jpeg


In the Elizabethan era buns and plat were very common. This was used as a protective style for mostly married women to keep hair out of the way. This was look was also used by women for when they wore any head accessory’s. such as begin or French hood.

http://erzetfashion.blogspot.co.uk/2014/11/braided-hairstyles.html


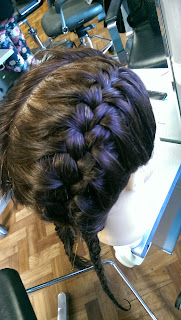
this week we were learning how to french plat, to fish tail plat and a how to create a bun.

I found french plats very simple to do. this is because i have done it in the past. however i found my self doing a Russian plat which is a lot like a french plat but the plat sits on top in staid of the inside/bottom. but after noticing my mastic it became easy.  

one thing i need to improve on the french plat is the parting. i need to do a clean parting so as to give it that clean look. 


to create a french plat

  • Make sure that the hair is well detangled.
  • Take the section you wont to French plat.
  • Like a regular plat take three sections to start with. Have two section in one hand and the third in the other hand. Start as a regular plat by crossing them over each other a few times to make it secure.
  • Gradually begin to incorporate new hair piece by grabbing more hair before crossing over. Do this for all three hair pieces.
  • Continual down the hair and you will notice that there is less hair to grab the more you move down.
  • Once all the hair has been added in as a braid continual down as a normal plat and the using an elastic band secure the hair     


equipment's

  1. hair brush 
  2. elastic bands  


 The fish tail plat was a lot more complicated to me. at fast i found it difficult to plat with just 2 pieces of hair in staid of three. i kept finding myself piking up a third hair pies. however i eventually got there in the end and now it has become one of my fevered plats to do.

one thing i need to work on now is the speed, but the more i practice the faster i will be.

To do a french plat all u need is to take the section of hair you wont to use.

  • Dived the it into two (brushed and detangled) 
  • take a small outer piece of one of the two sections of your hair. Cross the small piece over and add it to the inside of the other section. This piece you have crossed will now become a part of the other section.
  • Next make the exact same cross but this time you will use the other section of hair take a small piece from the outer part of the section and cross it over to the inside of the opposite section.
  • Continue crossing small outer pieces over to the inside of the opposing section. The smaller the pieces you cross, the better the braid will end up.
  • Once you've reached the end of the braid, tie it off with an elastic. 

equipment's

  1. hair brush 
  2. elastic bands 


we also got to learn how to create a bun. at fast this was a little complicated for me but i got there eventually.

To create a bun
  • Bringing all the hair up to a ponytail. Secure well using a good quality hair band.
  • Making sure that the hair is well deterged. Section the hair hanging of the end of the ponytail in to smaller section.
  • Taking each section pin it down backward toward the hair band, starting from ether corners of the hair (front, back, side 1 or side 2) when you pin one down then do the same to the posit side till all the hair has been pinned down to form a circular shape. You can use hair spry to stop any flyaway if preferred
equipment used  
  1. hair brush 
  2. elastic band or hair bond
  3. hair pins 

Friday, 7 November 2014

Accessory and decorations

In the Elizabethan era women would decorate their hair using purse, ribbons and feathers. In a lot of queen Elizabeth the 1st portraits her hair is beautifully decorated in purls.

Below is a beautiful modern Elizabethan hair look done using twist, plats, ribbons and purls. The ribbon have been weaved in through the twists.

The above hair is very Elizabethan. The way its twisted in to a up do looks like a hair style one would expect an Elizabethan woman to have everything from the twist, plats, ribbons to the purls.


i to had the opportunity to create an simple Elizabethan look.


  1. divide the hair into two ( make sure it is well brushed)
  2. french plated one side using a red ribbon and the other side without.
  3. using a wight ribbon i stared to weave it in using a needle
  4. i crisscrossed all thought the two french plat as if tying a shoe lase
  5. when i reached the end i knotted the two ends together and added a bow as an extra decoration

       all in all i like the final result of my Elizabethan look. however next time i will avid spacing out the ribbon and also use the red ribbon in both french plats. i will also try and get a more defined center parting.

equipment's used

  • hair brush 
  • tail comb
  • ribbons
  • needle
  • a bow  


curls and climping

In the Elizabethan time women (marred women) wore their hair up. They paid great attention to the front and side of their hair because that was the most visible parts of their hair. Frizzy hair was very fashionable and women would curl their hair using hot tongs to achieve this look.

 Looking at the above pictures I have attempted to achieve the same kind of frizz and curl on the below picture. Half of the head has been crimpt using crimpers and the other half curled using small curlers. I also used hair pins to hold the pins in place wells still cooling. This helps the curls not to drop. 


Introduction


Upper class fashion women and men had very elaborate hairstyles which were used to archive attention and success in court.  Queen Elizabeth had a natural red colour hair. This red hair look was copied by many of the nobility of the Elizabethan era, as was the fair hair ideal of an ideal woman! An Upper Class Elizabethan woman followed this fashion further and might even dye her hair yellow with a mixture of saffron, cumin seed, celandine and oil! Men gave their hair and beard similar attention.
Wigs were commonly used in the Elizabethan time. Queen Elizabeth 1 has been believed to have over 80 wigs which were called periwigs. Ruffs, or ruffles, were in high fashion and during the Elizabethan era these became more elaborate in size and style. The ruffs, or collars, framed the face and dictated the hairstyles of the age which were generally short for men (at the beginning of the Elizabethan era) and swept up look was required for women. A frizzy hairstyle was also one of the required styles for women! Women kept their hair long and the full natural beauty of their long hair was displayed by the young women of the era. The long hair flowing hair of a young girl was a sign of a virgin and the favoured hairstyle for a bride on her wedding day. An Elizabethan bride would adorn her hair with fresh flowers. Once a woman got married, she wore her hair swept up. Much of the hair was covered by some form of head covering. Long hair was generally dressed in a bun to which the variety of head coverings could be pinned. The front and sides of the hair received great attention as this was the area that was most displayed.
Hair was always combed back and away from the face because a high forehead was considered to be a sigh of beauty; therefor women would pluck the front hair from the scalp to achieve the desired look. (Ouch)  

Women used a number of accessories for their hair, those included; the coif (which is also known as the biggin and I used for children. It was plane white and women used it to keep the hair in place under the elaborate hats). The French hood (a half moon, or crescent, style band or brim sloping away from the face. The edges were often adorned with pearls or glass jewels, and a veil covered the back of the hair). The Atifet (a lot like the French hood but with a heart shaped crescent) and the caul (which was the Elizabethan hair net)